Showing posts with label painting. Show all posts

Thursday, March 24, 2011

Cherry Blossoms

I needed some art for my bathroom redo.  I have some seriously awesome artists in my family (like people who actually sell their stuff) but alas I DID NOT GET ANY OF THAT TALENT, I have zero artistic ability, but what I do have are mad cutting skills so after the trashcan went so well I decided to do more contact paper art. Each picture cost me about $4.00 to make… so YEAH!


024

I started off with these they cost me $8.something for the 3-pack.              @ (Wal-Mart)
002
Then I painted them all burnt umber. I liked the lines in the paint so I only did one coat of burnt umber.  The paint was like $1.something
005
When I was doing the trashcan I noticed the cherry blossoms in my clipart and I knew then, I would be using them.  I just enlarged them to the size I wanted, then I cut my contact paper to 8.5 X 11 and put it through my printer.   Then came the fun part, cutting them all out.
008
After they were all cut out I placed them on the canvas.
009
And carefully painted over the top of them.
010
I added two coats of white and peeled the contact paper off as soon as I was done with the second coat, while it was still wet.
011012020025
I’ll show you how it all came together when I do my big bathroom reveal. (hopefully soon)

Tuesday, March 15, 2011

End table Makeover

Living room makeover project #4 End table

I found this piece at the same time I found my awesome sewing chair.  I have wanted a end table for a while and I loved this one because it has two little drawers in it, perfect for storing my magazines and other books.  I recently bought a new rug for my living room and I loved the leaf patterns all throughout the rug so I thought I would incorporate the leaves into my end table.  I again used clear contact paper to get the look I wanted.  Who knew contact paper was so cool.

The End Table

065

First thing I did was sand it down and paint the top of it white the color I wanted the leaf to be.

021Then I found a leaf in the carpet that I wanted to copy.  If you look real close you can see the contact paper over the leaf.  I copied it with black Sharpie.

011

Then I cut it out and placed it on the top of the end table.

016

Then I painted over it with dark chocolate brown.

024

Then I rubbed stain all over the end table so that the white wasn’t so bright.

025

BEFORE

065

AFTER


032033043045

Project #1 Burnt Lunch Sack Wreath

Project #2 Sewing Table

Project #3 Sewing Chair

Monday, March 14, 2011

Sewing Chair Makeover

Living room redo project #3 Sewing Chair
Since I had an awesome new sewing table, I wanted to get a chair to got with it.  I found this chair at the thrift store for a couple of bucks and I really loved the overall look of it but it was in need of a  little bit of a makeover.  I found some awesome fabric at Wal-Mart and I knew that it would be the inspirations for my chair/sewing table. I’m very happy with the results.
BEFORE
064
AFTER
006003

BEFORE
064
AFTER
009
Project #1 Burnt Lunch Sack Wreath
Project #2 Sewing Table
Project #4 End Table

Sunday, March 13, 2011

Sewing Table Makeover

Living room makeover project #2 Sewing Table.

I was trolling Craigslist one day and I found this awesome sewing table.  I fell in love with it.  I just loved the style and it’s overall look, I knew when I saw it that I wanted it.  I really am happy with the end results.

BEFORE

066

AFTER

027

My hubby sanded it down for me, and then I painted it, I love the contrast of the black top with the white underneath.  Then I sanded part of the paint off and rubbed stain all over it including the top, then wiped it off, rubbed it on wiped it off you know the drill.

030

I love the original hardware, but they needed a little help so I spray painted those a nice silver and let some of the old color shine through on the edges for a little bit of contrast. 

031

033034

again

BEFORE

066

AFTER

030

Project #1  – Burnt Lunch Sack Wreath

Project #3 – Sewing Chair

Project #4 – End Table

Sunday, March 6, 2011

Flowerpot Trashcan

Since we got our new floor a couple of weeks ago, I have been on a little bit of a mission to redo the look of our home.  One of the rooms I tackled was our half bath.  I love it so far but it’s not ready for the big reveal, but I wanted to show you one of the projects I made for it, that was SUPER easy and turned out great.  And that was the trashcan.  I wanted something cute, but trashcans that are cute are spendy.  I wasn’t about to spend $20 + dollars on a trashcan so I improvised and used a flowerpot instead.
The original flowerpot wasn’t white, but I wanted white flowers so I spray painted a little bit of it white.
  154
I’m not one of those lucky people who do vinyl stuff, and I don’t know anyone who does so I had to improvised. I found a flower that I like in my clipart and printed in out on clear contact paper.  Then I cut it out, peeled off the back and placed it on the flower pot. 
155
Then I spray painted it with a metallic brown spray paint. I did two flowers one on each side.  I love how it turned out!
141
142

Monday, November 1, 2010

Faux Tile Backsplash & Dining room

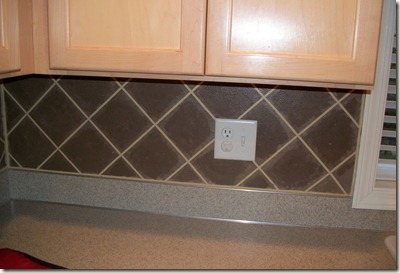
A couple of things that we have done to our home.  When we moved into our home 5 1/2 years ago we painted every wall.  On of those walls was the kitchen backsplash.  I picked a color I thought I liked and put it up.  From the moment it was finished I HATED it.  Not that it was a bad color or anything it was just basically the same color as the cabinets and it looked really strange. (a few painful years later when I could finally talk my husband into painting again)  We had the idea to make faux tile on the back splash instead.  I have loved it ever since.  Recently (like Friday) I helped my super talented friend Sharon over at This Thrifty House (I know I actually get to know her in real life) paint her backsplash I LOVE how she did hers so you should go check it out.  (and yes, those are the only things that get to live on my counter tops)

017

018

012010 
One thing I have always loved and still love 5 1/2 years later is our dining area.  We added the crown molding and the other wood at the bottom it was super easy and I LOVE the look.
 013 014  016