Showing posts with label cake. Show all posts

Thursday, September 15, 2011

Wonderful Cheesecake

This is one of my favorite cheesecake recipes.  I found it on allrecipes… of course.  I love it because it always turns out perfect with no cracks, and it tastes great.  I served it with some of my homemade blueberry pie filling.  You can find the recipe right here.

012006

I always cook my cheesecake longer than they say to otherwise it’s always soupy in the middle.  This recipe is super delicious.  Enjoy!!

I have another cheesecake recipe I’ll share with you during the pie contest if I don’t get enough submissions!! It’s BY FAR MY FAVORITE!! If I do get enough, then I share it with you sometime just because it’s awesome.

ON THE HORIZON

  • (YUMMY) Flourless cookies
  • 033_thumb1_thumb
  • Homemade Pizza Sauce
  • 007_thumb1_thumb
  • hopefully a bathroom redo
  • 041_thumb1_thumb
  • S’MORES 2.0
  • 002

Friday, August 26, 2011

gingerbread cheesecake

When I was looking for a dessert for family night,  I came across this recipe and thought I would try it out.

020

The recipe is for your favorite gingerbread cookie.  You bake some of the cookie dough  into cookies to crumble on top about 5-6.  Then you put some of the cookie dough in the bottom of a 9 X 13 to form the crust.  Then bake it according to the directions  of your recipe. BUT after I made this I thought you could really just make a “graham cracker” type crust with a bag of gingersnaps and butter.  Then crumble some of the leftover cookies on the top when you were done.  If I ever make this again, I would do it like that.

014

The cheesecake part is

14 oz. of sweetened condensed milk

8 oz. of cream cheese softened

1/3 cup of lemon juice

2 cups of cool whip thawed

Mix the first three ingredients together until well blended and then fold in the cool whip. Refrigerate for at least and hour. It really does taste better cold.  I would also like to try this recipe with a baked cheese cake.

016028029

Enjoy!!

Tuesday, July 26, 2011

Easy Purse Cake

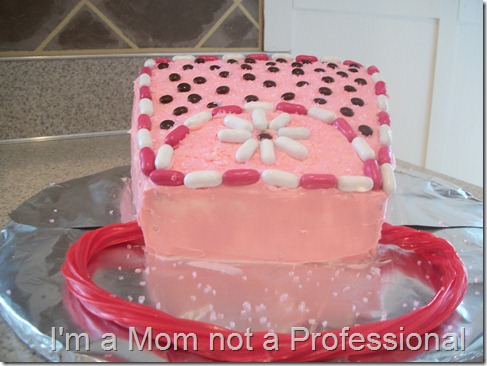
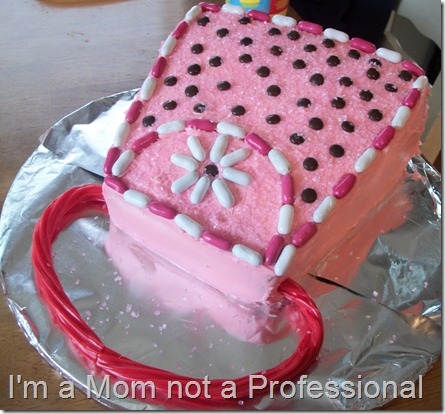
Well the purse cake turned out pretty great for our little princesses birthday yesterday.  She loved it!  Plus, it was super easy to make.  Here’s how

You’ll Need

  • 1 9X13 cake

  • 1 container of pink icing (or whatever color you want your purse to be)

  • assorted candy for decoration.  I used

  • mini M&M’s, licorice,  Good & Plenty, and pink sugar sprinkles.

072

Cutting the Cake

Make sure you cake is really chilled before cutting.  You might want to put it in the freezer for a little while.

Cut your 9 X 13 into 4 sections each about 1/2 inch shorter than the section next to it.  The largest section should be about 4 inches.

052

Stack the cake on their sides, to start forming the shape of the purse.  I know it doesn’t look so great now, but don’t worry.

053

I moved my cake to a cutting board at this point and cut the sides at an angle the top of the purse smaller than the bottom of the purse. I didn’t have to cut much off.

I054055
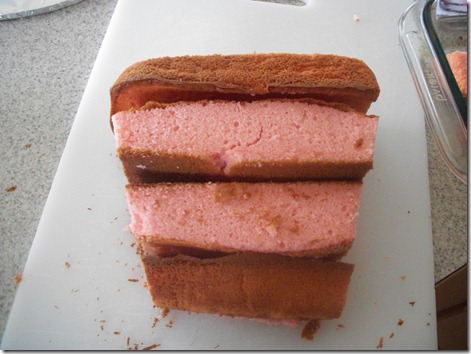
Then I cut down the top of the cake so it would have a nice gradual slope.  Like so

057

If you want you can stuff the cracks with extra cake.
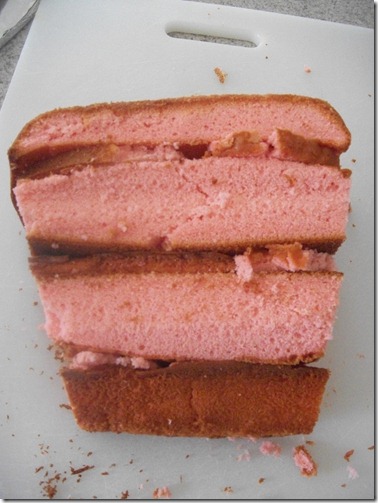
056

Stick the sections together with your favorite jam. Placing it on your cake board.  After it was all stuck together with jam I placed it back in the freezer for a good 20 minutes before I attempted to ice it.
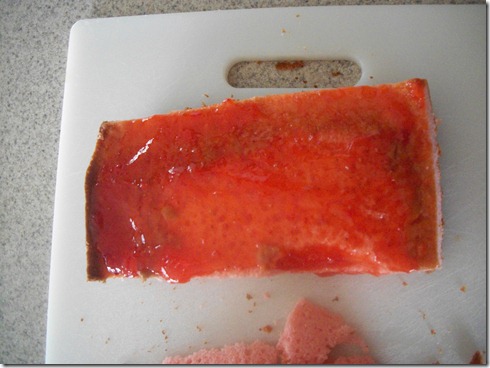
058

Once it’s out of the freezer I did a light crumb coat with vanilla icing and stuck it back in the freezer for about 5 min.

059

Then I iced it with the pink frosting.  Since my daughter picked a strawberry cake I just used strawberry icing so I didn’t have to tint mine.  It worked out great.   065
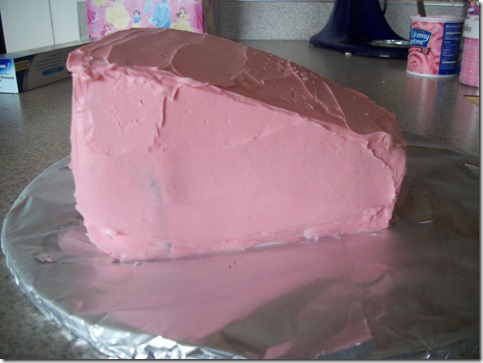
Also I didn’t worry about getting the icing super smooth, because I covered the whole thing in pink sugar sprinkles.  Continue to decorate with whatever candy you would like.

082072076081

This is a great cake for little helpers to help decorate. ENJOY!

Monday, July 25, 2011

Little Doggy Cake

I made this cake for my daughters 2nd birthday.  It’s one of my all time favorites.

You’ll Need

1 9X13 rectangular cake

1 container of chocolate frosting

2 Jr. Mints

2 white Necco Wafers

Red licorice

Black licorice

Red Fruit Roll-Up or Fruit by the Foot.

M& M’s

036

Cutting the cake

Make sure your cake is really chilled before cutting.  You might want to place it in the freezer for a little while.

I made this cake before I started blogging and taking pictures of everything.  So hopefully you can see how it’s done.  The white rectangle represents the 9x13 finished cake.  First you cut the body with the legs plus the head (leaving out the nose) out of the cake.  Then with the leftover cake you form an ear, tail and nose. Round off the nose so it looks like a real nose and not like a rectangle.  (make sense??)

doggy-001

Decorating the cake

Once you have all of your pieces cut out you can start the assembly.  Place your ear, nose and tail on the cake.  Ice all of the cake with a light crumb coat and place it back in the freezer for a few minutes.  Once the crumb coat is firm remove from the freezer and continue icing until the cake is completely iced.  Use a fork in make lines in the icing representing the fur.  Add a white Necco Wafer for the eye with a Jr. Mint on top.  Add a Jr. Mint for the nose.  Shape a tongue out of a red fruit roll-up or fruit by the foot. Add red hots for collar and another white Necco Wafer for the dog tag.  I added my daughters initial on the dog tag with chocolate frosting. Use the red licorice for the leash and add M&M’s for decoration on the leash.  Use the black licorice for the eye lashes.  All finished!

037

I was really happy with how it turned out.  Today is actually her 3rd birthday and she wants a purse cake.  If it turns out I’ll share that with you too! Happy birthday sweetie pie!!!

Monday, June 13, 2011

Super Easy Ice Cream Cake

This ice-cream cake is so easy and yummy.  All you need is 3-4 ingredients.

029

You’ll need

box of whoppers

box of ice cream bars (these come in lots of flavors any kind would do)

cool whip ( chocolate flavored cool whip is awesome if you can find it)

chocolate sauce (optional)

009

Unwrap the ice cream bars and start with four on the bottom.

010

add cool whip

011

then a layer of chopped Whoppers.

013

continue doing the same until you have 3 layers.

014

015016017019023

add chocolate sauce if you want.

029032

043042

ENJOY!!

I chopped my Whoppers using my food chopper.  Every time I use that thing I always have this song in my head forever.  So I thought I would share…

Stop having a boring tuna stop having a boring life!!

Friday, June 10, 2011

Corn on the Cob Cupcakes

When I saw the cover of Woman’s Day magazine this month I couldn’t stop smiling.  They had the cutest cupcakes I had ever seen!  So today I made some.They were super easy.

035

You’ll Need

cupcakes (the magazine actually has a recipe in it for cupcakes that includes cornmeal but I just used a white cake mix.)

white icing

yellow & white Jelly Belly jelly beans

yellow Starbursts

black sprinkles


I lightly iced my cupcakes

043

Then I just started adding rows of yellow and white jelly beans.

045

Then I cut a yellow starburst into quarters and smashed it a little bit to look like butter. 

  029

Then I added some black sprinkles for pepper.

027

Make two more cupcakes and line them up to form a corncob.  You can add corn holders on the end for a nice look.

031033035037038039040

Enjoy!

FYI* If you really want to make more than just one corncob you should go to a candy store that sells Jelly Belly jelly beans by color.  Otherwise one corncob is all you’ll get.   You could check that place that has a whole bunch of stores in one spot that teenagers like to roam around aimlessly, I think they call it a mall. You can usually can find a candy store there.